Introduction
The world wide web is filled with plenty of applications and delightful content ranging from scientific contributions over dicussion boards to company websites. A high fraction of this content is static or updated very irregulary. Also many websites are powered by content management systems that allow easy setup and management. By design those systems not only delivery static html to the consumer but generate the served content for every request over and over again by fetching dynamically content from databases or other content sources. Which results in wasting valuable ressources like computational power and energy. To transform into a more sustainable usage of ressources this is a huge challenge to solve.
The big picture
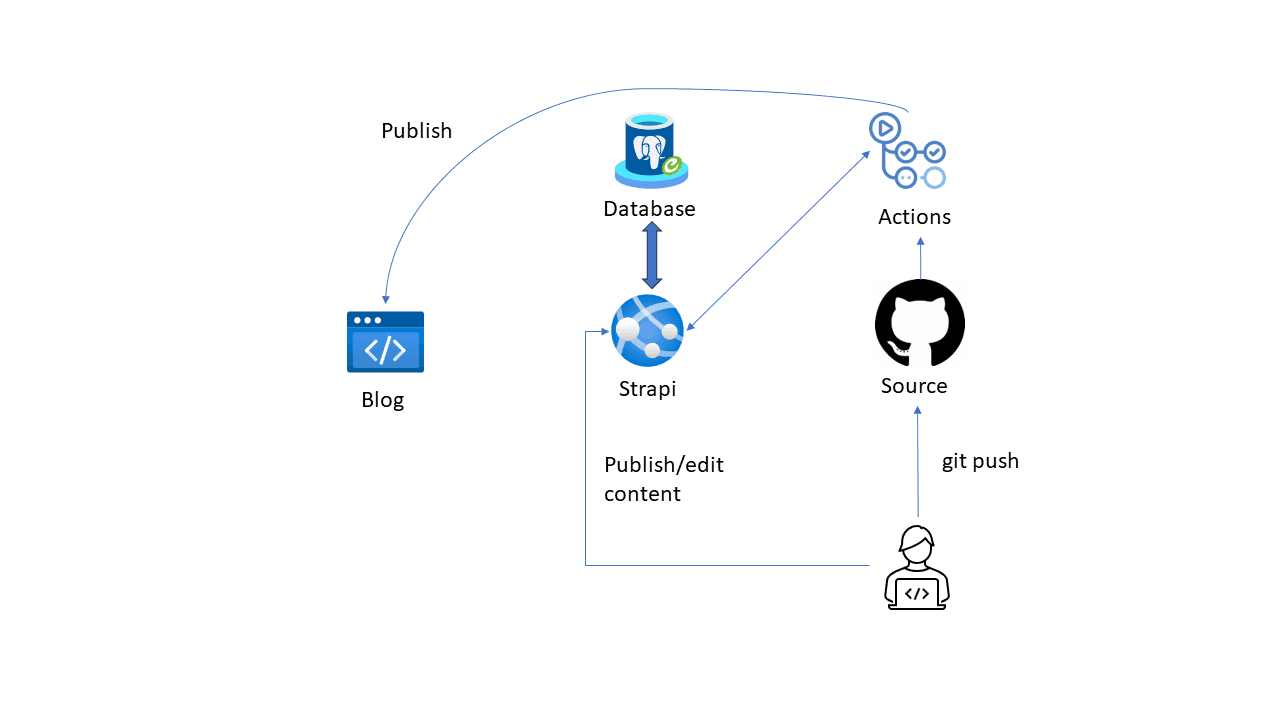
Meanwhile there are different approaches to efficiently serve semi-static content, like the headless content management system <a href="https://strapi.io/">Strapi</a>, <a href="https://www.gatsbyjs.com/">Gatsby.js</a> and Microsoft Azure. In this article we will setup & deploy a blog website. The following picture shows the architectural approach.

The whole content of our blog prebuilt into static html and served via the Azure Static Webapp service, which acts as our CDN (content delivery network). We use Strapi to easily create and edit content which is then consumed by a Gatsby.js which transforms the content to html, preprocesses pictures and adds interactivity. Github Actions act as our glue, since we utillize it to build & deploy updates of our page to azure. This is triggered when
- Changes to the source code occure
- The content of our page is changed in the Strapi cms
So every change to the content or the structure/design of our page issues a new build cycle that then is deployed as static content to the Azure Static Web App.
Strapi setup
First we bootstrap a new strapi project by following the <a href="https://docs.strapi.io/dev-docs/installation/cli#creating-a-strapi-project">getting started guide</a>. Then we also need to install an azure blob storage provider:
npm install strapi-provider-upload-azure-storage
Then we add the following to the config/plugin.ts file. So we use the local file system when developing locally and use our Azure Blob Storage container when running in production mode.
export default ({env}: any) => {
    const isProd = env('NODE_ENV', 'development') === 'production';
    if (isProd) {
        console.log("Using Azure Storage");
        return {
            upload: {
              config: {
                provider: "strapi-provider-upload-azure-storage",
                providerOptions: {
                  account: env("STORAGE_ACCOUNT"),
                  accountKey: env("STORAGE_ACCOUNT_KEY"),//either account key or sas token is enough to make authentication
                  sasToken: env("STORAGE_ACCOUNT_SAS_TOKEN"),
                  serviceBaseURL: env("STORAGE_URL"), // optional
                  containerName: env("STORAGE_CONTAINER_NAME"),
                  defaultPath: "assets",
                  cdnBaseURL: env("STORAGE_CDN_URL"), // optional
                },
              },
            },
          }
    }

    return {};
};
Now you can issue to start Strapi. With default settings the UI is located at <a href="http://localhost:1337">http://localhost:1337</a>.
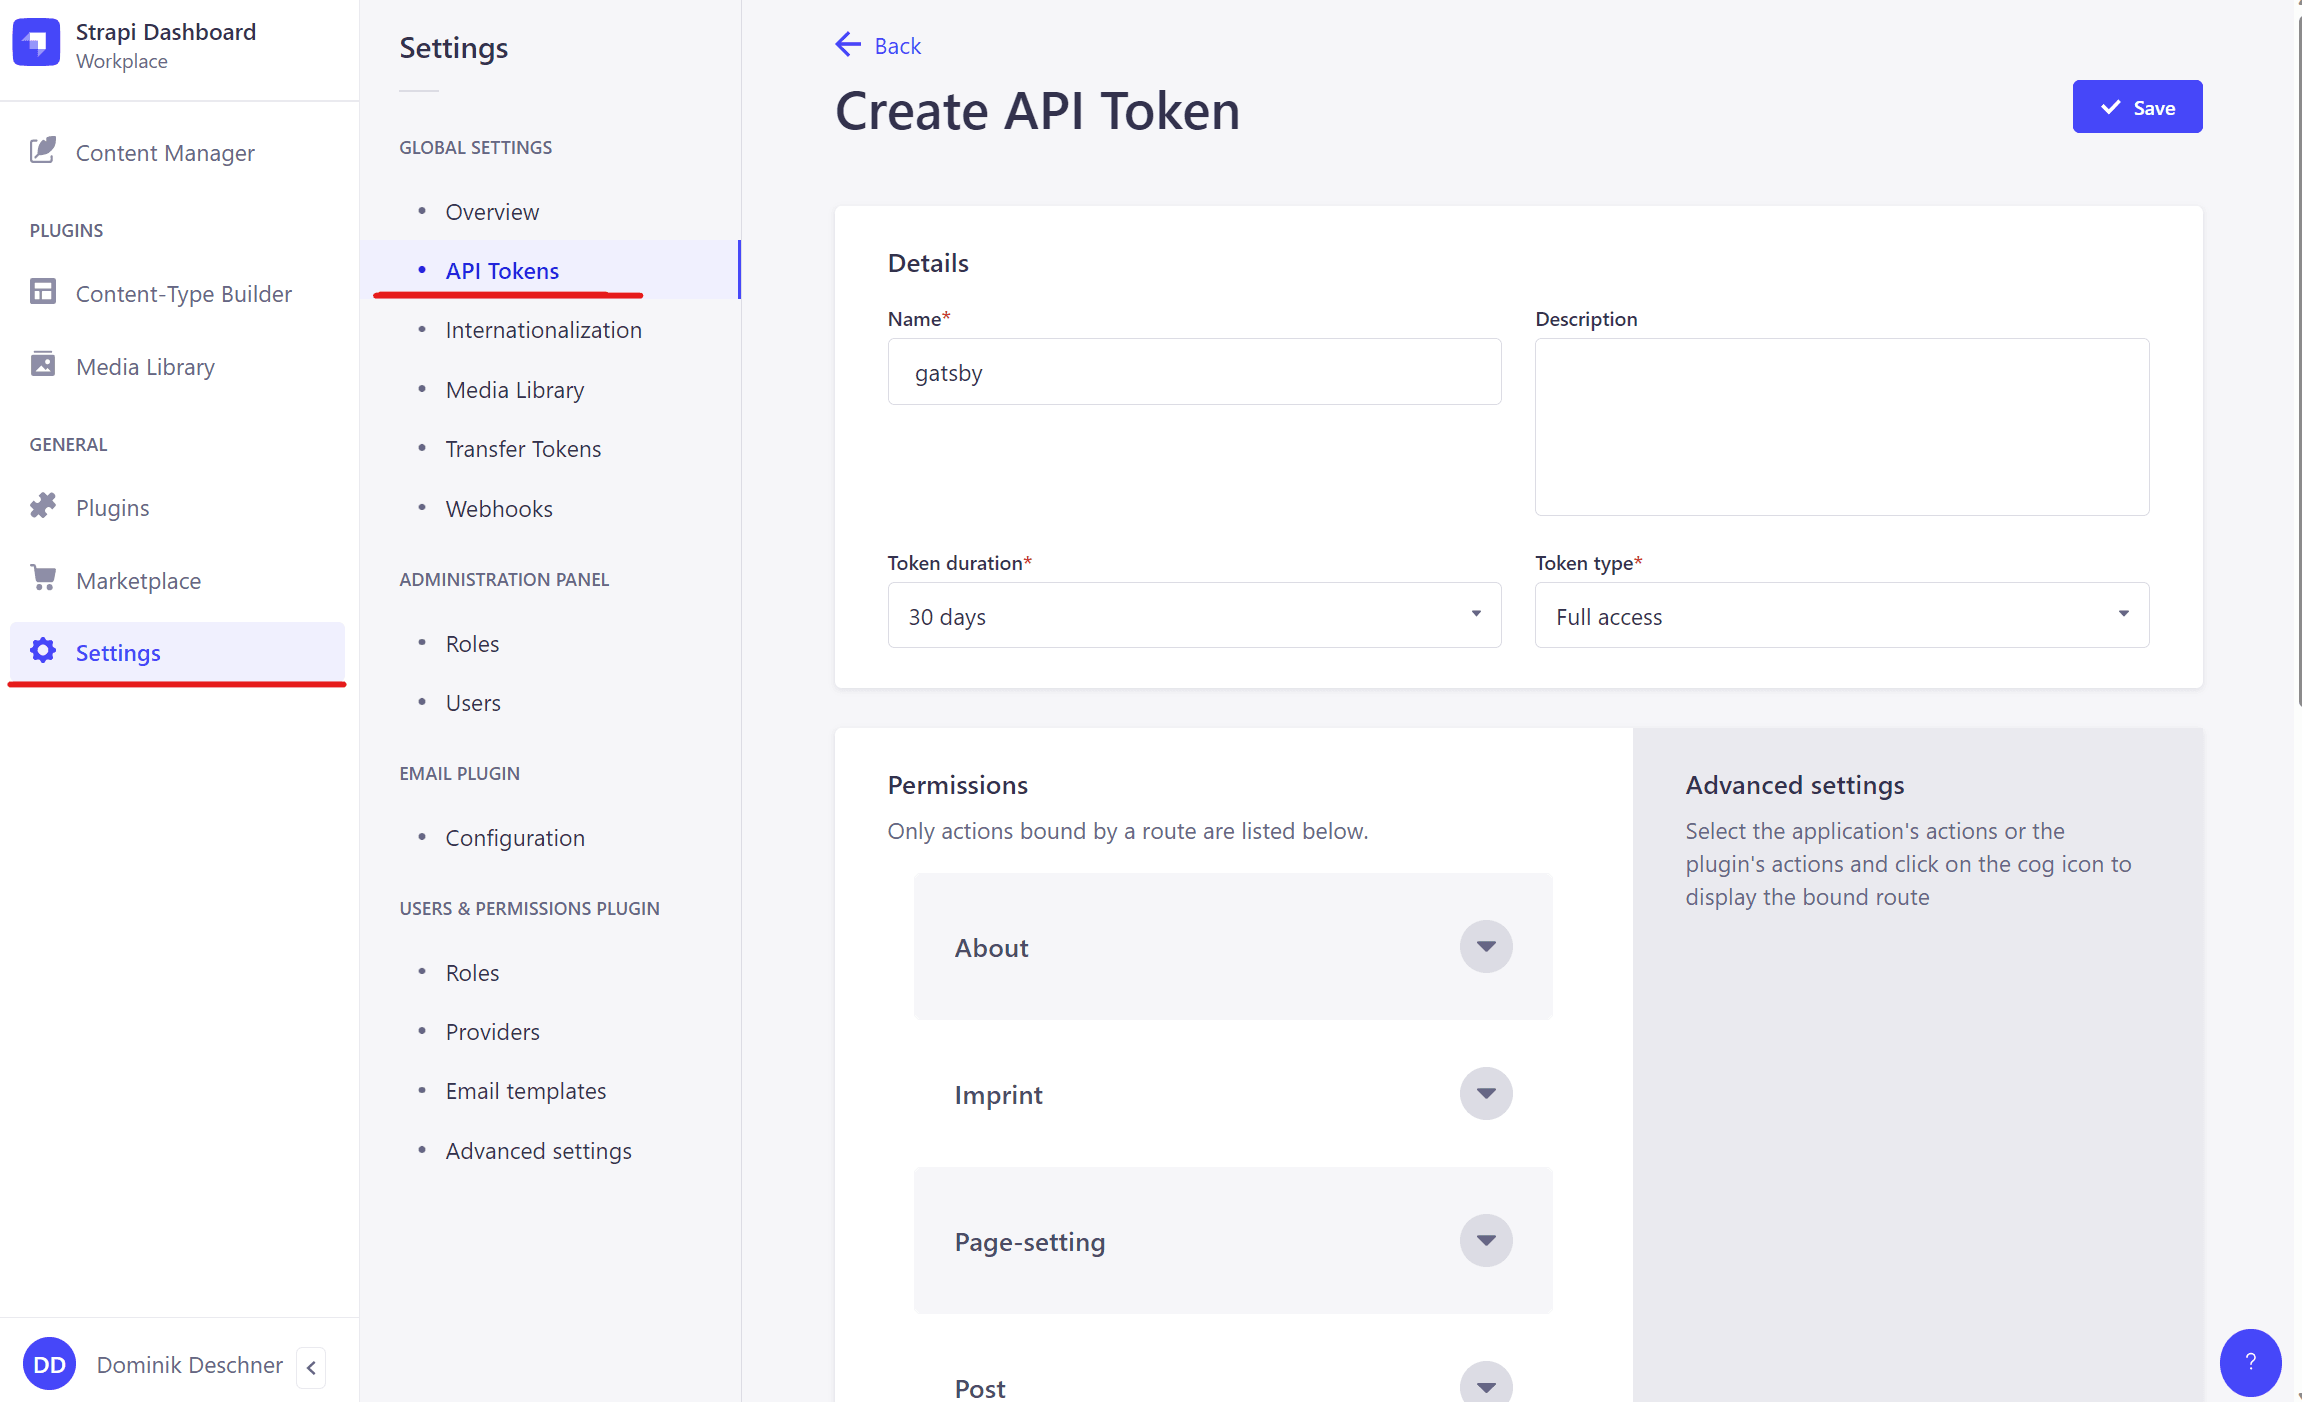
npm run build && npm run developThere we are guided through the initial setup of creating an administrator user. After logging in we need to create an API token which we use to authenticate Gatsby.js against. This process is described in the following screenshot. Please note it is necessary to use the token type <b>"Full access". </b>Save the token in a secure location we will use it later.

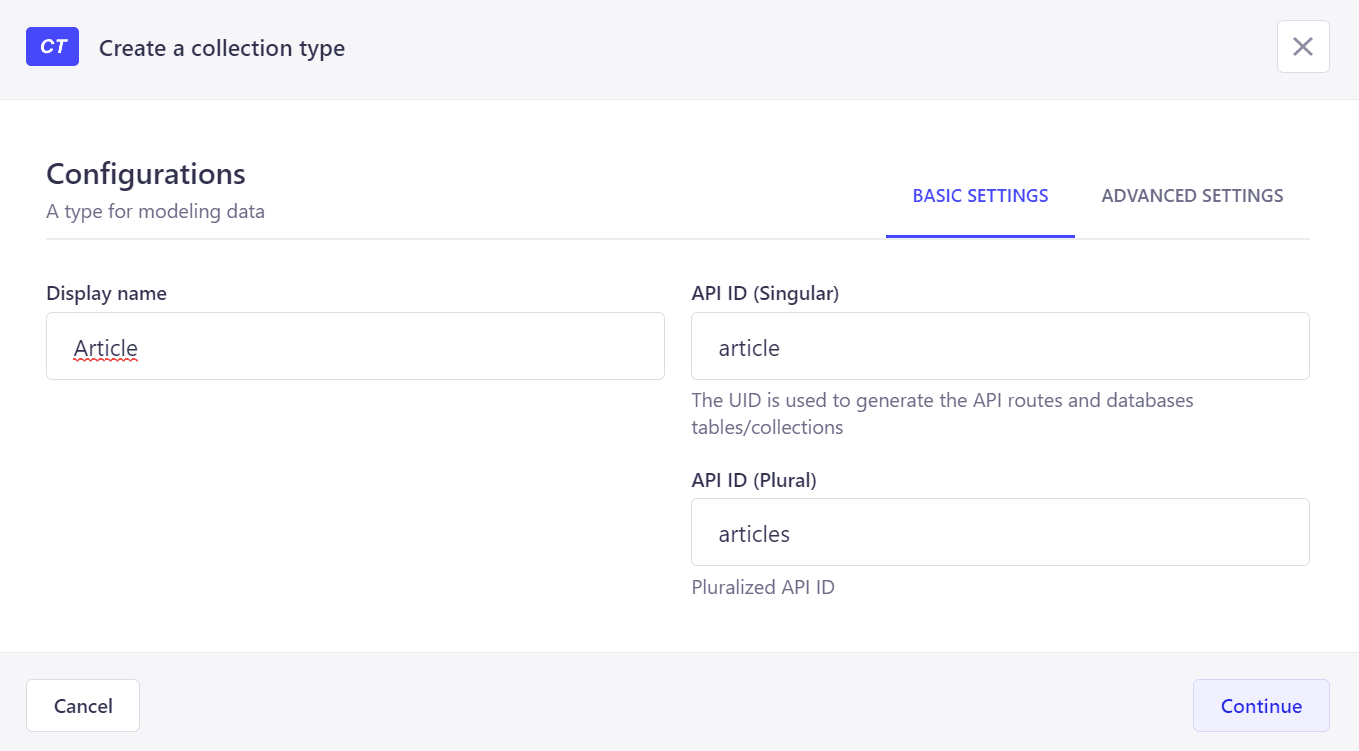
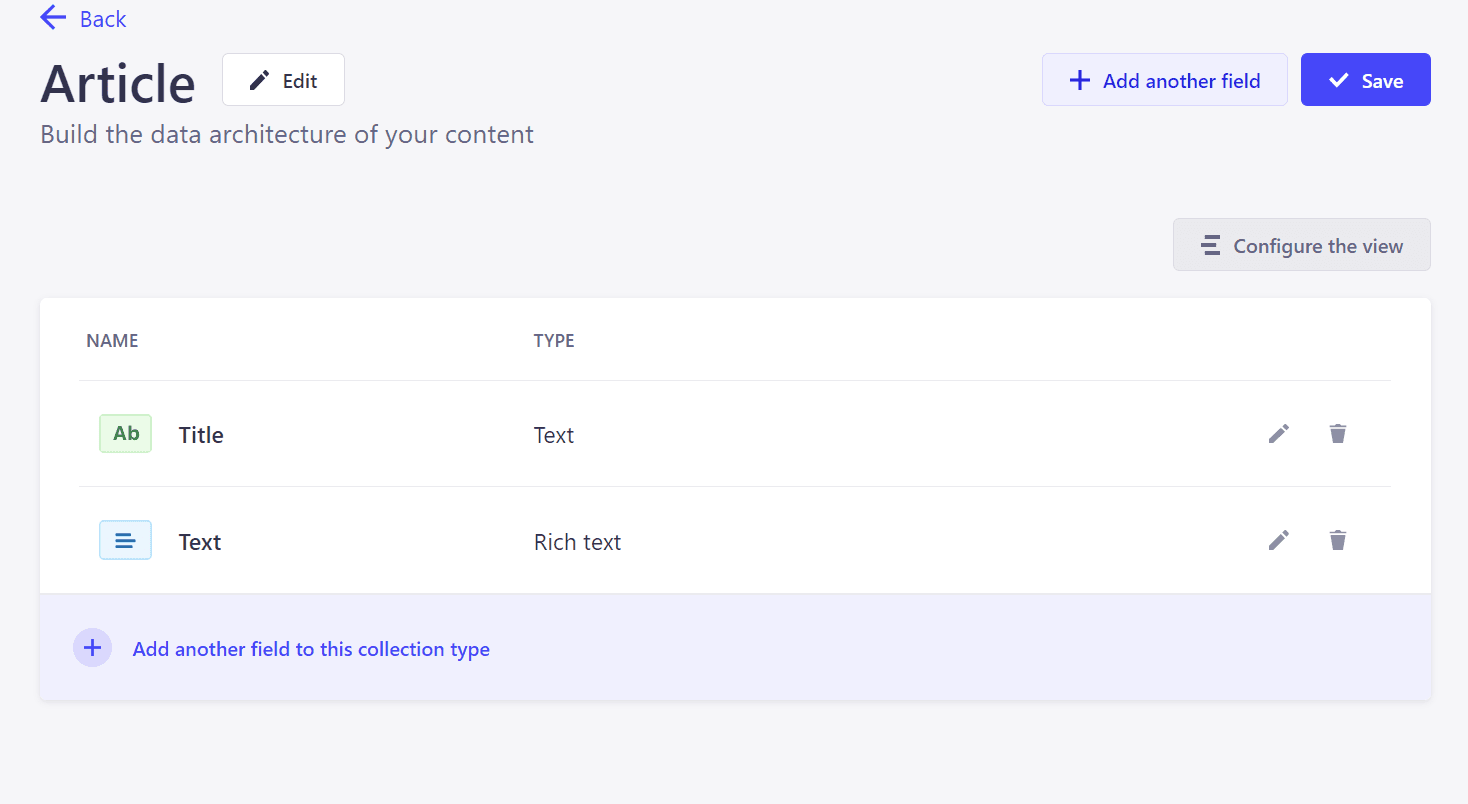
Then we need to create the data types we need to manage for our web page. Strapi distinguishes between single types, which means that there can be only one instance of the type. Typically we use single types to define the content of a single page like the imprint or an about page. And then there are collection types, which can have zero or more entries. For our example we will use a collection type to store our articles. The configuration process is illustrated in the following pictures.


Gatsby.js setup
First we create a new gatsby project by following the <a href="https://www.gatsbyjs.com/docs/quick-start/">quickstart guide</a>. Then install the <a href="https://www.gatsbyjs.com/plugins/gatsby-source-strapi/">strapi source plugin</a> and follow the instructions in order to set everything up. <b>Hint:</b> Here you need to use the API token we created previously. so we can consume data from our backend. Make sure to include the "article" collection type in the configuration so gatsby pulls the data into its' storage.
Then we can start our gatsby application by running
npm run developYou can observe the build log for the following output to know that everything has worked as expected. Furthermore we should see the datatype allStrapiArticle in the gatsby graphql explorer.
info Starting to fetch data from Strapi - /api/about with populate=%2A
info Starting to fetch data from Strapi - /api/imprint with populate=%2A
info Starting to fetch data from Strapi - /api/page-setting with populate=%2A
Azure Setup
In order to leverage the cloud for our web page we will create a new ressource group in the Azure Portal where the following services are created:
- App Service Plan
- App Service #1 (Strapi)
- App Service #2 (strapi-webhook-actions-proxy)
- PostgreSQL
- Static Web App
Since Strapi does not support async database initialization there is no easy way to use Azure Managed Identity so we are forced to authenticate the database via username/password.
Github Actions
Last but not least we need to orchestrate the deployment pipline. I use two distinct pipeline definitions one for deploying code changes to the repository and then a pipeline that is triggered by Strapi when the backend data is changed.
<b>Please note:</b> I am using a mono repo where Strapi and gatsby source is stored. Therefor I use <i>dorny/paths-filter </i>to only deploy relevant changes to the according services.
Repository CI/CD:
# This workflow uses actions that are not certified by GitHub.
# They are provided by a third-party and are governed by
# separate terms of service, privacy policy, and support
# documentation.

# GitHub recommends pinning actions to a commit SHA.
# To get a newer version, you will need to update the SHA.
# You can also reference a tag or branch, but the action may change without warning.

name: Deploy web app to Azure Static Web Apps

env:
  APP_LOCATION: '/' # location of your client code
  OUTPUT_LOCATION: './frontend/public' # location of client code build output
  GATSBY_STRAPI_API_URL: ${{ vars.GATSBY_STRAPI_API_URL }}
  STRAPI_TOKEN: ${{ secrets.STRAPI_TOKEN }}

on:
  push:
    branches:
      - main

permissions:
  issues: write
  contents: read

jobs:
  build_and_deploy_frontend:
    runs-on: ubuntu-latest
    name: Build and Deploy
    steps:
      - uses: actions/checkout@v3
        with:
          submodules: true
      - uses: dorny/paths-filter@v2
        id: changes
        with:
          filters: |
            fe:
              - 'frontend/**'
              - 'frontend/*'
      - name: Set up Node.js version
        if: steps.changes.outputs.fe == 'true'
        uses: actions/setup-node@v1
        with:
          node-version: '18.x'
      - name: npm install, build, and test
        if: steps.changes.outputs.fe == 'true'
        working-directory: ./frontend
        run: |
          npm install
          npm run build --if-present

      - name: Deploy Frontend
        if: steps.changes.outputs.fe == 'true'
        uses: Azure/static-web-apps-deploy@1a947af9992250f3bc2e68ad0754c0b0c11566c9
        with:
          azure_static_web_apps_api_token: ${{ secrets.AZURE_STATIC_WEB_APPS_API_TOKEN }}
          repo_token: ${{ secrets.GITHUB_TOKEN }}
          action: 'upload'
          app_location: ${{ env.APP_LOCATION }}
          output_location: ${{ env.OUTPUT_LOCATION }}

  build_and_deploy_cms:
    env:
      NODE_ENV: production
      AZURE_CMS_WEBAPP_NAME: strapi-app
      AZURE_WEBAPP_PACKAGE_PATH: './cms'

    runs-on: ubuntu-latest
    name: Build and Deploy CMS
    steps:
      - uses: actions/checkout@v3
        with:
          submodules: true
      - uses: dorny/paths-filter@v2
        id: changescms
        with:
          filters: |
            cms:
              - 'cms/**'
              - 'cms/*'
      - name: Set up Node.js version
        if: steps.changescms.outputs.cms == 'true'
        uses: actions/setup-node@v1
        with:
          node-version: '18.x'
      - name: npm install, build, and test
        if: steps.changescms.outputs.cms == 'true'
        working-directory: ./cms
        run: |
          npm ci
          npm run build --prod

      - name: Deploy CMS
        if: steps.changescms.outputs.cms == 'true'
        uses: azure/webapps-deploy@v2
        with:
          publish-profile: ${{ secrets.AZURE_WEBAPP_PUBLISH_PROFILE }}
          package: '${{ env.AZURE_WEBAPP_PACKAGE_PATH }}'
          app-name: ${{ vars.AZURE_CMS_WEBAPP_NAME }} # Replace with your app name
Content CD:
name: Deploy Gatsby to Azure Static Web Apps

env:
  APP_LOCATION: '/' # location of your client code
  OUTPUT_LOCATION: './frontend/public' # location of client code build output
  GATSBY_STRAPI_API_URL: ${{ vars.GATSBY_STRAPI_API_URL }}
  STRAPI_TOKEN: ${{ secrets.STRAPI_TOKEN }}

on:
  repository_dispatch:
    types: [strapi_updated]
concurrency:
  group: ${{ github.workflow }}-${{ github.ref }}
  cancel-in-progress: true

jobs:
  build_and_deploy_frontend:
    runs-on: ubuntu-latest
    name: Build and Deploy
    steps:
      - uses: actions/checkout@v3
        with:
          submodules: true

      - name: Cache gatsby cccontent
        uses: actions/cache@v3
        with:
          key: gatsby-${{ hashFiles('./frontend/package-lock.json') }}
          path: |
            ~/.frontend/node_modules
            ~/frontend/.cache
            ~/frontend/public

      - name: Set up Node.js version
        uses: actions/setup-node@v1
        with:
          node-version: '18.x'
      - name: npm install, build, and test
        working-directory: ./frontend
        run: |
          npm install
          npm run build --if-present
      - name: Upload artifacts
        uses: actions/upload-artifact@v2
        with:
          name: static-site
          path: ./frontend/public/**

      - name: Deploy Frontend
        uses: Azure/static-web-apps-deploy@1a947af9992250f3bc2e68ad0754c0b0c11566c9
        with:
          azure_static_web_apps_api_token: ${{ secrets.AZURE_STATIC_WEB_APPS_API_TOKEN }}
          repo_token: ${{ secrets.GITHUB_TOKEN }}
          action: 'upload'
          app_location: ${{ env.APP_LOCATION }}
          output_location: ${{ env.OUTPUT_LOCATION }}
Strapis webhook format is not compatible with github actions. In order to make it work we can use & deploy <a href="https://github.com/badsyntax/strapi-webhook-actions-proxy">strapi-webhook-actions-proxy</a> which marshalls the payload for us. This is also deployed. Then we can create a webhook in our strapi installation that targets the freshly deployed webhook-actions-proxy.
Conclusion
We just build our own static site application that brings similar convenience like a classic content management system but with plenty advantages like blazing fast page loads, SEO and a smaller and more substainable fingerprint. So contributing our part to save the planet does not only feel good but also provides us with better user experience. Doesn't that sound great?
